
I've worked on a few projects now that have used Stimulus JS and I really enjoy working with it. However, writing tests for it can be a bit of a pain. I am going to walk through some of the pain points I've encountered and walk through how I solved them. Hopefully this guide will encourage you to add tests for your own Stimulus controllers.
I will not be covering setting up Jest, but I will cover the couple things you'll need to use Stimulus with Jest.
A Bit of Setup
Mutation Observer Shim
Before we can write a test, we'll need to make sure we install Mutation Observer Shim to use in Jest. Stimulus uses mutation observers to watch for elements being added and removed from the dom so it can connect and disconnect instances of your controllers. Jest uses jsdom but it doesn't have support for mutation observers, thus this package adds that functionality for us.
Add mutation observer shim to your project and import it in your jest setup file. This is likely named setupTests.js or something similar. If you don't have one, you can place it at the root of your project or wherever you plan to put your tests.
// ./setupTests.jsimport 'mutationobserver-shim'
Make sure you've configured Jest to look for this file in jest.config.js.
// other config optionssetupFilesAfterEnv: ['<rootDir>/path/to/setupTests.js'],
Dom Helpers
While not strictly necessary, I've found that having a couple helpers to insert and clean up the dom between tests has been helpful. Create a utils.js, dom-helpers.js file or whatever you'd like to call it and insert the following.
const fakeDOMContentLoaded = () => {window.document.dispatchEvent(new Event('DOMContentLoaded', {bubbles: true,cancelable: true,}))}const mountDOM = (htmlString = '') => {const div = document.createElement('div')div.id = 'mountedHtmlWrapper'div.innerHTML = htmlStringdocument.body.appendChild(div)fakeDOMContentLoaded()return div}const cleanupDOM = () => {document.body.innerHTML = ''}export { cleanupDOM, mountDOM }
This exports two functions mountDOM and cleanupDOM. You can use mountDOM to give it some html and have it fire a DOMContentLoaded event after insertion. cleanupDOM simply removes the inserted html.
Setting Up The Test Environment
Create a new test file and import the Stimulus application, the controller you wish to test, and our dom helper utilities.
import { Application } from '@hotwired/stimulus'import { mountDOM, cleanupDOM } from '../support/helpers/dom_helpers'
Now we need to create a way to start and stop stimulus as well as setup our beforeEach and afterEach hooks to make everything work.
import { Application } from '@hotwired/stimulus'import { mountDOM, cleanupDOM } from '../support/helpers/dom_helpers'import FilterLinkController from '../../controllers/filter_link_controller'const htmlFixture = '<p>We will fill this in later.</p>'let application = nullconst startStimulus = (doneFn) => {application = Application.start()application.register('filter-link', FilterLinkController)mountDOM(htmlFixture)Promise.resolve().then(() => doneFn())}const stopStimulus = () => application.stop()beforeEach((done) => startStimulus(done))afterEach(() => {cleanupDOM()stopStimulus()jest.restoreAllMocks()})
Starting Stimulus
There's a couple things going on here that I want to zoom in on. Let's start with the startStimulus method.
let application = nullconst startStimulus = (doneFn) => {application = Application.start()application.register('filter-link', FilterLinkController)mountDOM(htmlFixture)Promise.resolve().then(() => doneFn())}beforeEach((done) => startStimulus(done))
Since Stimulus uses mutation observers to know when to connect controller instances to the dom, we need to make sure we don't run our tests before Stimulus is done initializing our controller. Jest has a handy done function that can be passed in which prevents Jest from moving on from a function until done is called.
To take advantage of this, the line Promise.resolve().then(() => doneFn()) is quite important. Promise.resolve() is forcing Jest to wait for all current processes running to finish, meaning our mutation observers. This allows Stimulus to respond and setup our controller. .then(() => doneFn()) then tells Jest it's time to move on.
Stopping Stimulus and Cleaning Up
In between each test, we want to make sure the dom is reset and that we intentionally stop stimulus from running.
const stopStimulus = () => application.stop()afterEach(() => {cleanupDOM()stopStimulus()jest.restoreAllMocks()})
cleanupDOM() removes the html from the body and jest.restoreAllMocks() makes sure to restore the original implementations of any mocks we created in our tests. stopStimulus() is pretty self explanatory but it's interesting why we need it.
I thought mutation observer being present would allow our controllers to disconnect themselves properly but they'll instead hang out in memory and reattach when you run the next test. This would then mean 4 tests in, any click actions would end up having 4 listeners and 4 instances of our controller being run. Manually stopping Stimulus after each test prevents this from occurring.
Write Tests Using Dom Events
Being that these are unit tests, you may be tempted to grab the instance of the controller you wish to test and call methods directly like controller.updateField(). Don't do that. Stimulus is meant to be interacted with through the dom and we should test it the same way. If you need to test that a function fires when a button is clicked, add that button to your html fixture and configure the appropriate Stimulus action. Then in your test, find the button and run .click() to fire the action.
If we call our controller methods directly, we run the risk of testing the wrong things, tying too heavily to the implementation, as well as making our test inaccurate because the dom needs to be in specific states before certain functions make sense. This will actually make our testing easier in the long run and make it easier to refactor later.
There's a great talk by Sandi Metz called The Magic Tricks of Testing (Youtube) that goes more in depth from a Ruby on Rails perspective the same idea on testing. Even if you're not in Rails or understand it, the talk is light on actual code and the concepts introduced apply broadly to other languages. I highly recommend reviewing this talk before writing your tests!
Example Test
In the examples above, you likely noticed the imported controller. We'll use this controller for our example test. Here's what that controller looks like.
// filter_link_controller.jsimport { Controller } from '@hotwired/stimulus'export default class extends Controller {static targets = ['link']markUnstable() {this.linkTarget.disabled = true}markStable() {this.linkTarget.disabled = false}}
This controller has a single link target and two functions that disable it and enable it. Our test html can be as simple as an anchor tag and two buttons that run the two stimulus functions. Since it changes some state in the html, we can check that the link is disabled or enabled appropriately.
Let's insert our dummy html.
const htmlFixture = `<div data-testid="controller" data-controller="filter-link"><a href="#" data-testid="link" data-filter-link-target="link">Link</a><button type="button"data-testid="unstableButton"data-action="filter-link#markUnstable">Unstable Button</button><button type="button"data-testid="stableButton"data-action="filter-link#markStable">Stable Button</button></div>`
We've added a wrapper div and placed our filter-link controller onto it. Then we added a link target and two buttons to run the two different functions. We'll grab each different button and assert their assigned functions run approprately. Start by creating a new jest test block and getting the elements we need from the dom. You can use describe and it but for this example I'm going to use test.
test('calling markUnstable disables the link target', () => {const link = document.querySelector('[data-testid="link"]')const button = document.querySelector('[data-testid="unstableButton"]')})
About Test IDs
I appended the dummy html with data-testid values for easy selection during the test. I specifcally used this pattern because you can install a helper library called DOM Testing Library and use a helper function called getByTestId (docs) to grab elements off the dom. That would make our test look like this:
test('calling markUnstable disables the link target', () => {const link = getByTestId(document, 'link')const button = getByTestId(document, 'unstableButton')})
It's helpful and read easier, but I'm leaving it out in this example to reduce the number of concepts to understand. I also want to make it clear that the document is (almost) fully featured and can be queried with css selectors as you might expect. Feel free to implement this into your testing.
Setup and Assert
Now that we have access to the link and button, lets set them to the expected state before we click the button and activate our stimulus action. We'll go ahead and do an additional expect here just to be sure we're in the state we expect.
test('calling markUnstable disables the link target', () => {const link = document.querySelector('[data-testid="link"]')const button = document.querySelector('[data-testid="unstableButton"]')link.disabled = falseexpect(link.disabled).toBe(false)})
Now click the button and expect that the link's disabled state changed.
test('calling markUnstable disables the link target', () => {const link = document.querySelector('[data-testid="link"]')const button = document.querySelector('[data-testid="unstableButton"]')link.disabled = falseexpect(link.disabled).toBe(false)unstableButton.click()expect(link.disabled).toBe(true)})
Success! When you run your test it should be green. If you want to double check, make the last expectation false and you can see the test fail.
Now do the opposite for the markStable method and the test will be complete! Here's the full example.
import { Application } from '@hotwired/stimulus'import FilterLinkController from '../../controllers/filter_link_controller'import { mountDOM, cleanupDOM } from '../support/helpers/dom_helpers'const htmlFixture = `<div data-testid="controller" data-controller="filter-link"><a href="#" data-testid="link" data-filter-link-target="link">Link</a><button type="button"data-testid="unstableButton"data-action="filter-link#markUnstable">Unstable Button</button><button type="button"data-testid="stableButton"data-action="filter-link#markStable">Stable Button</button></div>`let application = nullconst startStimulus = (doneFn) => {application = Application.start()application.register('filter-link', FilterLinkController)mountDOM(htmlFixture)Promise.resolve().then(() => doneFn())}const stopStimulus = () => application.stop()beforeEach((done) => startStimulus(done))afterEach(() => {cleanupDOM()stopStimulus()jest.restoreAllMocks()})test('calling markUnstable disables the link target', () => {const link = document.querySelector('[data-testid="link"]')const unstableButton = document.querySelector('[data-testid="unstableButton"]')link.disabled = falseexpect(link.disabled).toBe(false)unstableButton.click()expect(link.disabled).toBe(true)})test('calling markStable enables the link target', () => {const link = document.querySelector('[data-testid="link"]')const stableButton = document.querySelector('[data-testid="stableButton"]')link.disabled = trueexpect(link.disabled).toBe(true)stableButton.click()expect(link.disabled).toBe(false)})
Testing The Connect Lifecycle Method
I've written about this previously and while most of that content still stands, I use Promise.resolve() instead of setTimeouts now. If you need to test a stimulus controller that uses a setTimeout you could run into some issues with mocks that can make it a pain to test.
The setup is a little bit different for this. We'll need to make sure the startStimulus() function does not insert the html. We need to control when that happens using some new scoped beforeEach blocks.
let application = nullconst startStimulus = (doneFn) => {application = Application.start()application.register('filter-link', FilterLinkController)// removed mounting the dom herePromise.resolve().then(() => doneFn())}const stopStimulus = () => application.stop()beforeEach((done) => startStimulus(done))afterEach(() => {cleanupDOM()stopStimulus()jest.restoreAllMocks()})
This time we need to mount the dom in our test. This gives us the ability to modify the html before inserting if we need to test different things that happen on connect. Just like the beforeEach hooks, we need to use done again to wait for processes to finish, otherwise our test will move too fast and the assertions will fail.
// I like to use `describe/it` for connect testsdescribe('connect()', () => {// notice that done is used here on the testit('does something when it connects', (done) => {mountDOM(htmlFixture)// or '<div>whatever custom html you want for the test</div>'// Use promise.resolve to let processes finishPromise.resolve().then(() => {try {// expectations here!done() // ends the test} catch (error) {// important!// if we don't catch expectation failures, the test will time out// and make finding what failed hard to see.done(error)}})})})
We again use Promise.resolve() to wait for the stimulus to finish processing responding to the mutation observer, then run our expectations. Since the test won't finish unless done() is called, if there's a failure with an expectation, the test will hang until it times out. This is because jest stops execution on the expectation that failed, which means done() never gets called. Catching it allows jest to properly finish the test on failure and surface the error to you.
Testing Emitted Events
Sometimes controllers will emit custom events that we want to make sure happens. You can use this by adding a custom event listener to the controller html and then asserting on that handler.
Assuming we have a stimulus controller called cool-card and it has a function that when run emits an event from the controller element called cool-card:updated that we can listen for.
// imports...const htmlFixture = `<div data-testid="controller" data-controller="cool-card"><button type="button"data-testid="button"data-action="cool-card#update">Update</button></div>`// testing setup...describe('update()', () => {it('emits a cool-card:updated event', () => {const controller = document.querySelector('[data-testid="controller"]')const button = document.querySelector('[data-testid="button"]')// create a handler we can attach to the controller to listen for the eventconst handler = jest.fn()controller.addEventListener('cool-card:updated', handler)// fire the eventbutton.click()// make sure it only got called onceexpect(handler).toHaveBeenCalledTimes(1)})})
If you need to dig into the detail sent by the event, you can dig that out from the handler using .mock.calls and inspecting the specific call.
// since we already asserted it was called one time,// we can assume the first call is the correct callconst { detail } = handler.mock.calls[0][0]expect(detail).toStrictEqual({item: {id: 24,},})
Debugging Tests
Testing can be really hard, so it's beneficial to be able to stop and insepect the state of variables during a test if something isn't working as expected. Thankfully, you can do that in Jest with a little bit of setup.
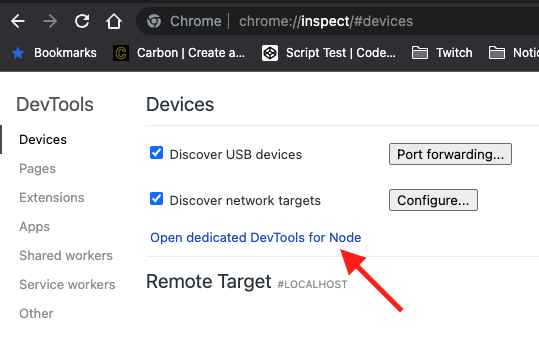
Open Chrome and navigate to chrome://inspect and open "Dedicated DevTools for Node"
In your package.json file, there's likely a script that runs your test that might look something like this:
"test:js": "$(yarn bin)/jest",
Create a new script with the following (name it whatever you want):
"test:js:debug": "node --inspect-brk $(yarn bin)/jest --onlyChanged --runInBand",
node --inspect-brk will allow the node process running jest to attach to Chrome's node debugger that we just opened. --onlyChanged will only run jest against the files we changed. Jest will also accept part of a file name to filter what test to run. For example: yarn test:js:debug filter_link_controller will only run the test that has that name in the file name.
--runInBand makes jest run tests sequentially rather than in a worker pool of child processes. Easier to debug.
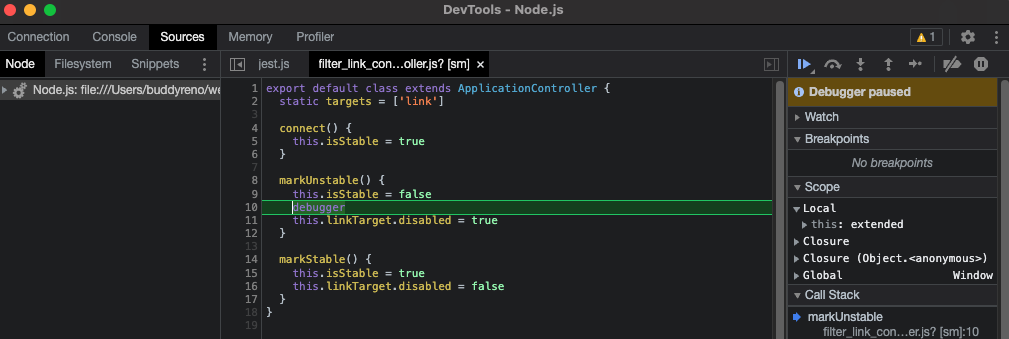
Now add a debugger line in one of your tests or controller your testing. This will be where the debugger will stop.
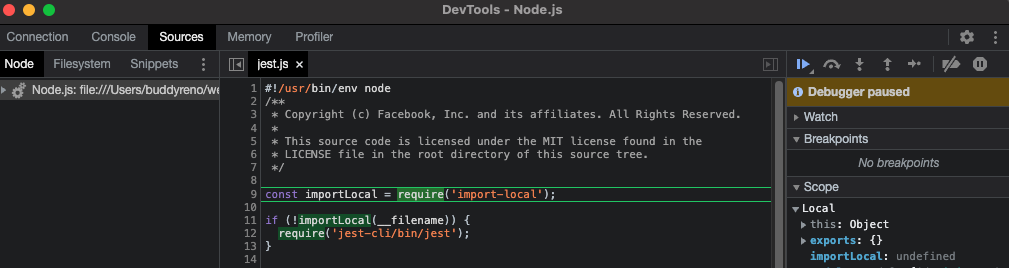
When you run your test there will be an initial break that gives you the opportunity to get ready to run your test.
Press play and your test will stop at the debugger line!
Conclusion
I hope this proves to be a useful resource for you to refer back to. I will continue to update this post with new information and tricky things I find while testing Stimulus. If you have any questions or improvements, feel free to message me on LinkedIn.
Thanks!